| Panel | ||||||||||||
|---|---|---|---|---|---|---|---|---|---|---|---|---|
| ||||||||||||
This article is part of the Installation Guide. You can read it alone or click on the previous link to easily move between the steps.
|
Linux
...
| Columna | ||||||
|---|---|---|---|---|---|---|
Getting startedThis how-to will attempt to help with TrinityCore, and also show how this can be done in a way that also shows you the basics of how linux compilations works.
Advices:
Your server may be abruptly killed by an angry administrator or system staff for overuse of system resources. Creating a user to work withStart with logging in to your Linux-machine and create an account for the server itself - on most recent distributions this can easily be done with the following command :
Note : Change <username> into the preferred username of your server-account - we will as far as possible avoid using specific usernames in this how-to. Sample usernames found in various parts of this guide: wow , trinity ( - select a logical name that makes sense to you when creating the user - ). Required softwareSee Requirements Optional softwareThese tools are only needed or useful if you are connecting from a Windows host to your Linux machine Graphical database-viewing/editingPlease note that the software called Navicat is NOT supported due to issues with how it handles SQL-files with "/* */"-style comments. We advise all users to stay well clear of this program unless they really are looking for issues. Remote console connects to the serverFile transfer through SFTP or FTP |
...
| Panel | ||||||
|---|---|---|---|---|---|---|
| ||||||
Content
|
Building the server itself
Getting the source code
3.3.5
| Bloque de código |
|---|
cd ~/
git clone -b 3.3.5 git://github.com/TrinityCore/TrinityCore.git |
This will clone 3.3.5a branch, this is the RECOMMENDED branch for starters.
6.x
| Bloque de código |
|---|
cd ~/
git clone -b 6.x git://github.com/TrinityCore/TrinityCore.git |
This will clone 6.x branch, note that this is NOT the recommended branch for starters.
The directory TrinityCore will be created automatically and all the source files will be stored in there.
| Nota |
|---|
FreeBSD users will need to apply the patch located here for g3d to compile properly, before doing anything else. |
Compiling the source code
Creating the build-directory
To avoid issues with updates and colliding source builds, we create a specific build-directory, so we avoid any possible issues due to that (if any might occur)
| Bloque de código |
|---|
cd TrinityCore
mkdir build
cd build |
Configuring for compiling
To configure the core, we use space-separated parameters attached to the configuration-tool (cmake) - do read the entire section before even starting on the configuration-part.
This is for your own good, and you HAVE been warned. A full example will also be shown underneath the explanations.
| Bloque de código |
|---|
cmake ../ [additional parameters] |
Parameter explanations
path to your OpenSSL library - do not use if you have OpenSSL installed system wide:
| Panel |
|---|
-DOPENSSL_LIBRARIES=<path to OpenSSL library> |
path to your OpenSSL includes directory - do not use if you have OpenSSL installed system wide:
| Panel |
|---|
-DOPENSSL_INCLUDE_DIR=<path to OpenSSL includes> |
...
Note : * means "used by default", and does not need to be set.
The above parameters when combined into a full example :
| Bloque de código |
|---|
cmake ../ -DCMAKE_INSTALL_PREFIX=/home/<username>/server -DWITH_WARNINGS=1

Another Example Below:
cmake ../ -DCMAKE_INSTALL_PREFIX=/home/wow/server -DCONF_DIR=/home/wow/server/etc -DTOOLS=1 -DWITH_WARNINGS=1 |
The above build the tools, set installation base directory to /home/<username>/server and show all warnings during compile.
Note that you WILL have to configure the server well if you ever want to use the RA-access functionality.
Building the core
After configuring and checking that everything is in order (read cmakes output), you can build Trinity (this will take some time unless you are on a rather fast machine)
| Bloque de código |
|---|
make
make install |
If you have multiple CPU cores, you can enable the use of those during compile :
| Bloque de código |
|---|
make -j <number of cores>
make install |
Alternatively:
| Bloque de código |
|---|
make -j$(nproc) install |
After compiling and installing, you will find your core binaries in /home/<username>/server/bin, and the standard configuration files in the /home/<username>/server/etc folder.
(As usual, replace <username> with the username you created earlier). Now you can continue reading on and learn how how to update the source tree.
Keeping the code up to date
TrinityCore developers are always at work fixing and adding new features to the core. You can always check them here. To update the core files, do the following :
| Bloque de código |
|---|
cd ~/TrinityCore/
# For 3.3.5 Branch
git pull origin 3.3.5

# For 6.x Branch
git pull origin 6.x |
Now return to the compilation-section again, and repeat the instructions there.
Installing MySQL Server
When configuring MySQL make sure you remember the password you set for the default root account and that you enabled both MyISAM and InnoDB engines.
You can leave all the other settings as default. You might want to enable remote access to your MySQL server if your are also testing a website for your Trinity server or if you have friends testing with you which need access from remote. Remember that this will decrease the security level of your MySQL server!
SPECIAL NOTES!
Things to notice :
| Panel |
|---|
-DSSLLIB=<path> has been deprecated and is not used at all (remove this if ever used before) |
The new method for custom SSL-libraries are:
| Panel |
|---|
-DOPENSSL_LIBRARIES=<path to OpenSSL libraries directory> |
The paths for installation can be done without any other parameters but this :
| Panel |
|---|
-DCMAKE_INSTALL_PREFIX=/path/to/where/you/want/core/to/be/installed |
It will create the following structure:
| Panel |
|---|
<path>/bin/ - binaries will be placed here |
Also, compile has been tested on Debian 8 x32/x64, Ubuntu 15.04 x64 - all without problems IF YOU DO NOT MESS AROUND ON YOUR OWN!
OS X
Getting started
This guide describes how to get TrinityCore running on OS X. OS X ships with several libraries including OpenSSL and a special version of Readline - both required by TrinityCore. But: They are useless. OpenSSL is too old and Readline is... well... special. So we have to build the right ones. This is fairly easy and by doing this on your own (using programs like MacPorts or Homebrew is the alternative) you may learn more about libraries, your Mac and its handling on a non-graphic way. But no matter what you're doing in this guide there is one rule you should remind and never ever break:
DO NOT INSTALL ANYTHING YOU BUILD IN THIS GUIDE TO A SYSTEM-RELEVANT PATH! Rather use a path in your home directory.
We're going to put all the TrinityCore stuff to your home directory in the next step, even the installed binaries. We need to tell TrinityCore where its libraries are installed to. Further I guess you simply want to type "cmake" or "mysql" instead of "/Users/<Username>/Trinity/bin/cmake" or "/usr/local/mysql/bin/mysql". So we gonna set up a profile file which extends the default PATH and DYLD_LIBRARY_PATH variable and create a folder for the TrinityCore stuff:
| Bloque de código |
|---|
mkdir ~/Trinity
nano ~/.profile |
Add the following lines:
| Bloque de código |
|---|
export TRINITY=/Users/<Username>/Trinity
export PATH=$PATH:$TRINITY/bin:/usr/local/mysql/bin
export DYLD_LIBRARY_PATH=$DYLD_LIBRARY_PATH:$TRINITY/lib:/usr/local/mysql/lib |
Press Ctrl+O followed by Ctrl+X to save and close the file. Done. Quit the terminal application and restart it.
There is also an autocompletion script for git which can be downloaded and included here.
| Bloque de código |
|---|
curl -o ~/.gitcompletion "https://raw.githubusercontent.com/git/git/master/contrib/completion/git-completion.bash"
nano ~/.profile |
Add the following line:
| Bloque de código |
|---|
source ~/.gitcompletion |
Press Ctrl+O followed by Ctrl+X to save and close the file. Done. Quit the terminal application and restart it.
Building the libraries
Open a terminal and change to your download folder. Safari automatically extracts .gz archives and leaves the tar ball.
OpenSSL
| Bloque de código |
|---|
tar xvf openssl-1.0.2e.tar
cd openssl-1.0.2e
./Configure darwin64-x86_64-cc shared --prefix=$TRINITY
make -j 4
make install
cd .. |
Readline
| Bloque de código |
|---|
tar xvf readline-6.3.tar
cd readline-6.3
./configure --prefix=$TRINITY
make -j 4
make install
cd .. |
CMake
| Bloque de código |
|---|
tar xvf cmake-3.4.1.tar
cd cmake-3.4.1
./bootstrap --prefix=$TRINITY
make -j 4
make install
cd .. |
Boost
| Bloque de código |
|---|
tar xvf boost_1_60_0.tar
cd boost_1_60_0
./bootstrap.sh --with-libraries=system,thread,program_options,filesystem,iostreams,regex --prefix=$TRINITY
./b2 -j 4
./b2 install
cd .. |
ZeroMQ
| Bloque de código |
|---|
tar xvf zeromq-4.0.7.tar
cd zeromq-4.0.7
./configure --prefix=$TRINITY
make -j 4
make install
cd .. |
Installing TrinityCore
You successfully installed all the dependencies. Now it's time to install the server.
Obtaining the source and preparing the build
| Bloque de código |
|---|
cd $TRINITY
git clone https://github.com/TrinityCore/TrinityCore.git repo
mkdir build
cd build |
Generate the Xcode project files using CMake:
| Bloque de código |
|---|
cmake $TRINITY/repo -G "Xcode" \
-DMYSQL_ADD_INCLUDE_PATH=/usr/local/mysql/include \
-DMYSQL_LIBRARY=/usr/local/mysql/lib/libmysqlclient.dylib \
-DREADLINE_INCLUDE_DIR=$TRINITY/include \
-DREADLINE_LIBRARY=$TRINITY/lib/libreadline.dylib \
-DBOOST_INCLUDEDIR=$TRINITY/include \
-DBOOST_LIBRARYDIR=$TRINITY/lib \
-DOPENSSL_SSL_LIBRARIES=$TRINITY/lib/libssl.dylib \
-DOPENSSL_CRYPTO_LIBRARIES=$TRINITY/lib/libcrypto.dylib \
-DOPENSSL_INCLUDE_DIR=$TRINITY/include \
-DZMQ_LIBRARY=$TRINITY/lib/libzmq.dylib \
-DZMQ_INCLUDE_DIR=$TRINITY/include \
-DCMAKE_INSTALL_PREFIX=$TRINITY \
-DWITH_WARNINGS=1 |
Building the binaries
This step may take a while and needs to be done every time the source code changes. Afterwards you'll find the binaries in "/Users/<Username>/Trinity/bin"
Terminal
| Bloque de código |
|---|
xcodebuild -config Debug -jobs 4
xcodebuild -config Debug -target install |
"Debug" can be replaced by "Release" or "RelWithDebInfo"
Xcode
Open the generated "TrinityCore.xcodeproj" and select "Product" -> "Build" for a Debug build or "Product" ->"Archive" for a Release build. Do not forget to select "install" as compilation target.
Keeping the code up to date
| Bloque de código |
|---|
cd $TRINITY/repo
git reset --hard HEAD
git pull |
Repeat the steps described in "Building the binaries".
Setting up the server
... this part needs to be re-written. Coming soon!
Windows
| Sección | |||||||||
|---|---|---|---|---|---|---|---|---|---|
|
Configuring and generating Visual C++ solutions with CMake
Before you begin, create an empty directory called Build. In this example, we will use D:\Build.
Note: If CMake do not recognize C/C++ compiler, choose Specific Native Compiler, and choose path to target vcvarsall.bat, e.g. C:\Program Files\Microsoft Visual Studio 12.0\VC\vcvarsall.bat
Click Browse Source... -> Select |
2. Click Browse Build... -> Select |
3. Click Configure |
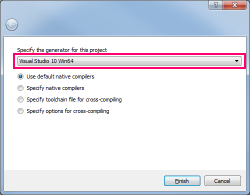
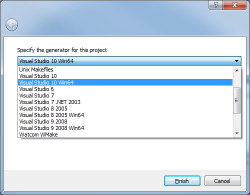
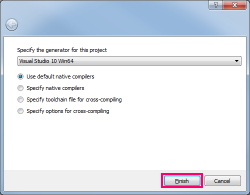
4. Make sure Use default native |
5. In the drop-down menu, choose the |
6. Click Finish. |
7. Make sure Tools is checked. This will |
8. Click Configure again. |
9. Click Generate. This will install the |


Note: If MySQL is not found by CMake it is required to set MYSQL_INCLUDE_DIR = C:/mysql_libs/include and MYSQL_LIBRARY= C:/mysql_libs/lib_XX/libmysql.lib.
XX depends if you are compiling in 32 or 64 bits mode. (See the 9th point of the Windows requirement list in Core Installation.)
Note 2: If you get linker errors (e.g "error LNK2019: unresolved external symbol mysql_server_init"), make sure MYSQL_LIBRARY is set to the libmysql.lib that matches your compile mode (x64 vs 32 bits).
(If you do not see the MYSQL fields in CMake, tick the Advanced box).
Note 3: If you get an error that cmak can't find openssl, check the advanced checkbox. Find the openssl in the list and point to the correct directories (you have to point to the openssl root and the openssl include directories)
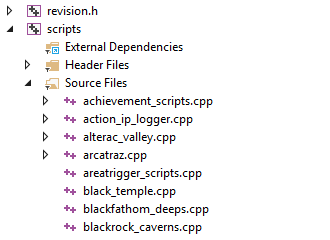
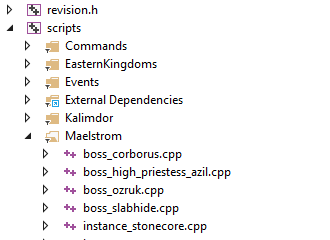
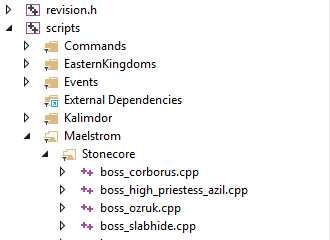
Tip: Use the WITH_SOURCE_TREE option to enable a pretty source tree structure in Visual Studio:
no source tree:
| flat:
| hierarchical:
|
|---|
Compiling the Source
Browse into your D:\Build folder and open TrinityCore.sln with Visual Studio Community.
On the menu at the top, click Build and select Configuration Manager.
Set Active Solution Configuration to Release
In the list menus below "Help", set Active Solution Platform to Win32 (if you set 64-bit compilation during the CMake configuration, select Win64)
click Close (settings get saved instantly). On some versions of Visual Studio, this will be read and automatically set based on the CMake settings.
Right-click ALL_BUILD in the Solution Explorer on the left sidebar and select Clean .
(on some VS2013 versions, click the Build menu and select Clean Solution.)
Right-click ALL_BUILD and select Build.
- Compilation length differs from machine to machine, you should expect it to take 5-30 minutes.
- If you are asked to "Reload build files" during the compile, do so.
- When the build is complete, you will find a message similar to the one below (the numbers may be different).
| Panel |
|---|
| ========== Build: 22 succeeded, 0 failed, 0 up-to-date, 0 skipped ========== |
Note: in MySQL 5.7 64bit there is a bug. Binary_log_types.h and Binary_log_funcs.h are missing.
you can download http://dev.mysql.com/downloads/file/?id=456917 and open it with winrar (or google something for opening tar)
then go to mysql-5.7.7-rc\libbinlogevents\include there you'll find both files. copy them to C:\Program Files\MySQL\MySQL Server 5.7\include (default location, change to your directory if you have a different mysql install location
You will find your freshly compiled binaries in the C:\Build\bin\Release or C:\Build\bin\Debug folder. These are all used to run your server at the end of this instruction.
You will need the following files in order for the core to function properly:
| Panel |
|---|
libeay32.dll |
There are a few DLLs that needs to be manually added to this folder, and you need to copy them over from the following installation/bin directories:
| Panel |
|---|
libmySQL.dll - C:\Program Files\MySQL\MySQL Server 5.x\lib |
Keeping the Source Up-to-Date
TrinityCore Developers are always at work fixing and adding new features to the core. You can always check them here, or by viewing them from within Git Extensions.
Open your TrinityCore repository in GitExtensions.
- Click on the blue arrow
- In the new window, click Pull.
This will sync your local repo to the latest commits from the branch you have setup as default.
Now you will need to re-run CMake Configure & Generate to update your SLN files.
Compile
??
Profit!!
Help
If you still have any problem, check:
- Updating or starting with TrinityCore issues
- Trouble with your TrinityCore Install / Readme 1st / FAQs
- Or just start a new topic in the forums
| Panel | ||||||||||||
|---|---|---|---|---|---|---|---|---|---|---|---|---|
| ||||||||||||
This article is part of the Installation Guide. You can read it alone or click on the previous link to easily move between the steps.
|
...
| Info | ||
|---|---|---|
| ||
You can find it in our new wiki at: https://trinitycore.info/en/install/Core-Installation |