This article is part of the Installation Guide. You can read it alone or click on the previous link to easily move between the steps.
Windows
Getting started
Before you get scared by this long guide, we assure you the procedure is quite simple. Most of the following steps are to be performed only the first time you install Trinity and only the Trinity updating procedures will need to be run from time to time.
Required Software
Pulling & Compiling the Source
Pulling the Source
- Create a directory in which Core files will be pulled (for example: C:\Trinity).
- Right-click on the directory and click on Git Extensions -> Clone.
- Fill in the data as follows:
3.3.5
Repository to clone: https://github.com/TrinityCore/TrinityCore
Destination: C:\Trinity
Subdirectory to create: <none>
Branch: 3.3.5
Personal Repository: Yes
This will clone 3.3.5a branch, this is the RECOMMENDED branch for starters.
master
Repository to clone: https://github.com/TrinityCore/TrinityCore
Destination: C:\Trinity
Subdirectory to create: <none>
Branch: master
Personal Repository: Yes
This will clone master branch, note that this is NOT the recommended branch for starters.
Click Clone. Within a few minutes all of the TrinityCore source files will be pulled into the directory C:\Trinity.
Configuring and generating Visual C++ solutions with CMake
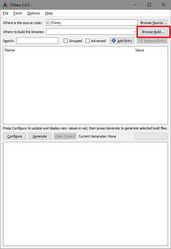
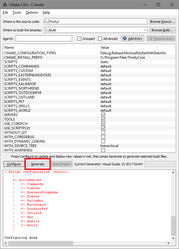
Before you begin, create an empty directory called Build. In this example, we will use D:\Build.
Note: If CMake do not recognize C/C++ compiler, choose Specific Native Compiler, and choose path to target vcvarsall.bat, e.g. C:\Program Files\Microsoft Visual Studio 14.0\VC\vcvarsall.bat
Click Browse Source... -> Select |
2. Click Browse Build... -> Select |
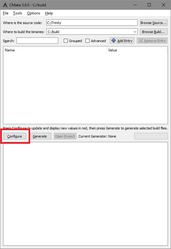
3. Click Configure |
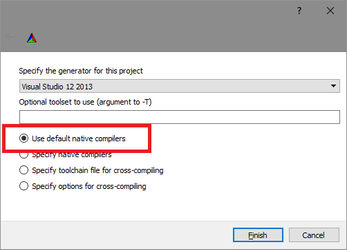
4. Make sure Use default native |
5. In the drop-down menu, choose the |
6. Click Finish. |
7. Make sure Tools is checked. This will |
8. Click Configure again. |
9. Click Generate. This will install the |


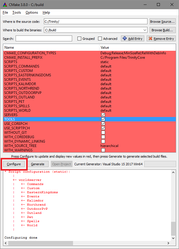

Note: If MySQL is not found by CMake it is required to set MYSQL_INCLUDE_DIR = C:/mysql_libs/include and MYSQL_LIBRARY= C:/mysql_libs/lib_XX/libmysql.lib.
XX depends if you are compiling in 32 or 64 bits mode. (See the 9th point of the Windows requirement list in Windows Core Installation.)
Note 2: If you get linker errors (e.g "error LNK2019: unresolved external symbol mysql_server_init"), make sure MYSQL_LIBRARY is set to the libmysql.lib that matches your compile mode (x64 vs 32 bits).
(If you do not see the MYSQL fields in CMake, tick the Advanced box).
Note 3: If you get an error that CMake can't find OpenSSL, check the advanced checkbox. Find the OpenSSL in the list and point to the correct directories (you have to point to the OpenSSL root and the OpenSSL include directories)
Tip: Use the WITH_SOURCE_TREE option to enable a pretty source tree structure in Visual Studio:
no source tree:
| flat:
| hierarchical:
|
|---|


Compiling the Source
Browse into your D:\Build folder and open TrinityCore.sln with Visual Studio Community.
On the menu at the top, click Build and select Configuration Manager.
Set Active Solution Configuration to RelWithDebInfo
In the list menus below "Help", set Active Solution Platform to x64 (if you set 32-bit compilation during the CMake configuration, select x86)
and click Close (settings get saved instantly). On some versions of Visual Studio, this will be read and set automatically based on the CMake settings.
Right-click ALL_BUILD in the Solution Explorer on the left sidebar and select Clean
(if your GUI does not show Solution Explorer, click the Build menu and select Clean Solution).
Right-click ALL_BUILD and select Build (or go to the Build menu and click Build Solution (Ctrl+Shift+B)).
- Compilation time differs from machine to machine, you can expect it to take anywhere between 5 and 30 minutes.
- If you are asked to "Reload build files" during the compile, do so.
- When the build is complete, you will find a message similar to the one below (the numbers may be different).
Note: in MySQL 5.7 64bit there is a bug. Binary_log_types.h and Binary_log_funcs.h are missing.
you can download http://dev.mysql.com/downloads/file/?id=456917 and open it with winrar (or google something for opening tar)
then go to mysql-5.7.7-rc\libbinlogevents\include there you'll find both files. copy them to C:\Program Files\MySQL\MySQL Server 5.7\include (default location, change to your directory if you have a different mysql install location
You will find your freshly compiled binaries in the C:\Build\bin\RelWithDebInfo or C:\Build\bin\Debug folder. These are all used to run your server at the end of this instruction.
You will need the following files in order for the core to function properly:
3.3.5 :
authserver.exe
authserver.pdb
authserver.conf.dist
worldserver.exe
worldserver.pdb
worldserver.conf.dist
libmysql.dll
libeay32.dll
ssleay32.dll
master :
bnetserver.exe
bnetserver.pdb
bnetserver.conf.dist
bnetserver.cert.perm
bnetserver.key.perm
worldserver.exe
worldserver.pdb
worldserver.conf.dist
libmysql.dll
libeay32.dll
ssleay32.dll
There are a few DLLs that needs to be manually added to this folder, and you need to copy them over from the following installation/bin directories:
libmySQL.dll --> C:\Program Files\MySQL\MySQL Server 5.x\lib\
libeay32.dll, ssleay32.dll --> C:\OpenSSL-Win64\ or C:\OpenSSL-Win32\ (depends on if your core is 64-bit or 32-bit)
Please remember to rename the worldserver.conf.dist and authserver.conf.dist / bnetserver.conf.dist files to worldserver.conf and authserver.conf / bnetserver.conf respectively, unless you want to keep the configuration files of a previously compiled version of the core.
Keeping the Source Up-to-Date
TrinityCore Developers are always at work fixing and adding new features to the core. You can always check them here, or by viewing them from within Git Extensions.
Open your TrinityCore repository in GitExtensions.
- Click on the blue arrow
- In the new window, click Pull.
This will sync your local repo to the latest commits from the branch you have setup as default.
Now you will need to re-run CMake Configure & Generate to update your solution (.SLN) files.
Compile
??
Profit!!
Help
If you still have any problem, check:
- Updating or starting with TrinityCore issues
- Trouble with your TrinityCore Install / Readme 1st / FAQs
- Or just start a new topic in the forums
This article is part of the Installation Guide. You can read it alone or click on the previous link to easily move between the steps.